Regular visual inspections help homeowners identify early signs of cracks, stains, and plaster damage. Prompt action minimizes ceiling repair costs.
Most ceiling problems stem from moisture. Check for leaks in the roof and pipes, then dry affected areas. Contact Ceiling Repairs Perth now!
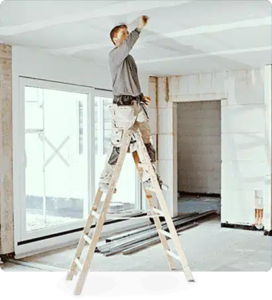
Licensed professionals can help with ceiling issues that require structural repairs. They also know how to coordinate specialists for multi-faceted projects.
Cracks
Cracks in the ceiling can be a distressing sight. Whether they are serious or not depends on the location and cause of the cracks. In many cases, the presence of cracks in the ceiling is a sign of normal home settling but, when accompanied by sagging or wall cracks, they may indicate more severe structural damage that should be looked at by a professional.
Hairline cracks in the ceiling, less than 1/16 inch wide, are often a sign of cosmetic wear and tear and can usually be re-taped and painted over without causing further damage. They can be caused by paint build up, plaster expansion or shrinkage due to fluctuations in humidity and temperature or can be the result of DIY work such as removing light fixtures or installing a skylight. Cracks that are wet or water-stained, however, are more serious and should be dealt with before patching the ceiling.
Discolored cracks in the ceiling are usually the result of water damage and can be caused by leaking roofs or plumbing. These cracks are best repaired by hiring a plumber to determine the source of the problem and make repairs before trying to repair the cracks.
Large spider web cracks in the ceiling are more serious and should be repaired by a qualified contractor. These cracks are the result of excessive pressure on the ceiling structure. They are often caused by a combination of factors such as a poor building design, unbalanced load on the ceiling and floor, uneven settlement or the movement of heavy items such as furniture or appliances on the upper level of the home.
It is possible to repair these types of cracks by applying a high quality, flexible, paintable caulk that will move with any underlying movement. The cracks should be thoroughly cleaned and sanded before the caulk is applied. For the best results, a skim coat should be applied over the entire area to smooth and prepare the surface for caulking. If the cracks extend through a light fixture or other ceiling vents, the holes will need to be filled and the new caulk should then be taped and smoothed before painting.
Water Stains
Water stains are more than just unsightly, they’re often a sign of serious damage occurring within your walls and ceiling. Depending on the color and extent of the stain, it may indicate a leaking roof, a broken pipe or even rotting wood. If left untreated, it’s possible that water stains in the ceiling will also lead to mold and mildew throughout your home.
Before starting a ceiling repair project, you should always turn off the electricity and water supply in the area. Make sure to wear eye protection and a dust mask. Next, you should carefully clean the stain using a damp cloth or sponge to remove any dirt and debris. Then, thoroughly dry the site with another cloth or sponge. Finally, it’s time to apply a stain-blocking primer, following the manufacturer’s instructions.
Once the stain has been properly cleaned and primed, you’re ready to paint. Choose a color that matches the rest of the ceiling, and use a brush or roller to apply it evenly. Then allow the ceiling to fully dry before removing any masking tape.
Although covering a water stain with paint is effective, it’s important to address the source of the problem before you start painting again. If you can’t find the source of the leak, consider consulting a professional. Roofing professionals can help fix damaged or aging roofs, while plumbers can tackle leaking pipes or other plumbing issues.
For large water stains, drywall professionals can repair the damaged drywall and plaster, and repaint it to match the surrounding area. If the drywall is damaged beyond repair, however, it may be necessary to replace it altogether.
Leaks
Water damage to your ceiling isn’t just a nuisance—it can also affect the structural integrity of your home and create an environment for mold and mildew. If left unattended, water leaks can cause severe problems that will require costly repairs and renovations. However, you can avoid expensive water damage by addressing the problem early and taking preventive measures.
Water leaks in the ceiling can be caused by a number of factors, including a failing roof or plumbing issues. To determine the source of a leak, look for signs of moisture such as sagging in the ceiling or bubbling paint. Water stains on the ceiling can also indicate a problem. Adding ventilation in the attic and running a dehumidifier can help eliminate condensation, which is often the source of leaking ceilings.
If you have a persistent leak in your ceiling, it’s best to call in the professionals. A professional will be able to identify the source of the leak and address it correctly, preventing future leaks.
If your ceiling has extensive water damage, you may need to remove and replace a large section of the drywall or plaster. This is a big project and requires professional installation. However, the sooner you take action, the less severe the damage will be and the easier it will be to repair.
Leaking ceilings can lead to health hazards due to the buildup of mold and mildew, which can irritate sensitive respiratory systems. Additionally, water leaking from the ceiling can affect furniture, artwork, and other belongings. It can also result in sagging or crumbling drywall, which will need to be repaired.
Leaving a leaky ceiling can be an expensive mistake, as it will only get worse over time. The longer it is exposed to water, the more extensive the damage will be and the more costly the repair will be.
You can do a few things to prevent leaks from forming in the first place, such as sealing bathroom fixtures and re-caulking tiling or tubs. You can also improve ventilation by adding exhaust fans in bathrooms and kitchens, opening windows, and running a dehumidifier. Finally, you can make sure there’s enough insulation in the attic to keep water from seeping through the ceiling and into rooms below.
Repairing a Hole in the Ceiling
Holes in the ceiling can be caused by a number of things, including pests, rodents and poor paint application. It’s important to repair holes in the ceiling as soon as they are found in order to prevent them from becoming worse and causing water damage.
The quickest and easiest way to fix a hole in the ceiling is by using drywall. Drywall, or plasterboard as it’s sometimes called, is made from gypsum and it’s widely used in the construction of interior walls and ceilings. It’s easy to cut and shape drywall to make a patch, and it can be easily fixed with joint compound.
It’s worth remembering that if you do decide to do your own ceiling repair, it’s a good idea to wear protective equipment. A dust mask and safety goggles will help to protect you from any debris or dust that may be created whilst you’re working. It’s also advisable to take care not to drop any tools or materials, as they could fall onto people below and cause injury.
When repairing a hole in the ceiling, it’s best to start with removing any loose debris. Once the hole has been cleaned, it’s a good idea to sand down the surrounding area. This will help to create a smooth surface that’s ready for painting. It’s a good idea to use a fine-grit sandpaper, rather than a coarse one, to avoid damaging the drywall.
Once the patch has been created, it’s a good idea to apply a second coat of joint compound over it. This will help to seal the hole, and then you can either leave it as is, or if you want to repaint your ceiling, you can sand down the surface again to prepare it for a new coat of paint.
Leaving damaged areas of your ceiling untreated isn’t a good idea, as it can lead to further problems with your home’s structure and insulation. Contacting a professional contractor as soon as you notice any damage to your ceiling will help to ensure that it’s repaired quickly and effectively.